React를 어제 정리했는데 오늘은 Redux다.
리덕덕 공식 문서를 읽어 봤지만 온통 영어 투성이다.
읽다가 한국어 번역 눌렀는데 더 모르겠어서 그냥 한국 사람이 정리한 블로그를 봤다.
그래도 모르겠더라. 이게 나라냐?
꾸이이이익
Redux
Redux는 왜 쓸까?
우리는 React 때 State와 props를 배웠다.
State의 값을 다른 js파일로 보낼 때 props를 매번 이주시켰던 기억이 있나?
그거 때문에 state와 props는 비행기 값만 오지게 나갔다.
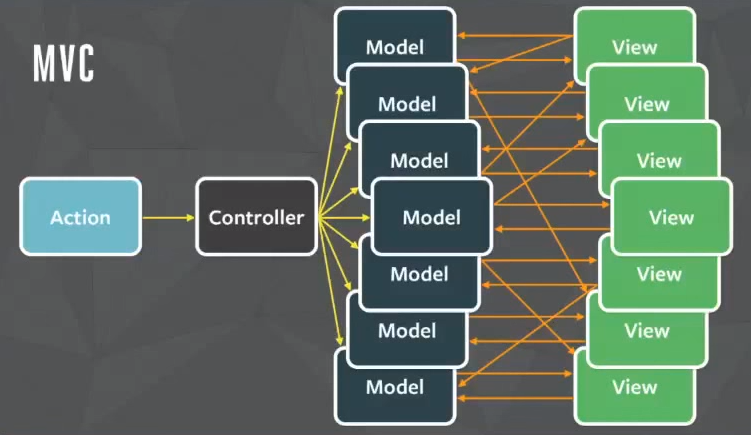
Redux는 그런 불편함 없이 Store라는 저장소를 만들어 state를 한 곳에서 관리하는 것이다.
마치 State계의 옥천 Hub랄까?
모든 택배가 모이는 그곳.. 택배의 지옥. 그곳에 우리의 State가 모여있다.
어쩌면 당신의 State도 옥천 Hub에 갇혀 당신을 기다리고 있을 수 있다.
사진으로 비교해 보자.
Redux가 없는 React의 State, props 
Redux가 있는 React의 State, props 
요렇게 State를 관리하기 쉽게 만들어 주기 위한 Redux.
앞으로 잘 사용해 보자
Redux - Action / Action Function
Action이라는 개념이 있다.
기존에 있던 setState? 랑 비슷한 느낌?
Store에 있는 값을 변경하려면 Action이 필요하다.
1
2
3
4
{
  type: "CHANGE_NUMBER",  //* 꼭 type이 필요하다. 나중에 이 action을 불러올 때 쓰는 값.
  number: 2            //* 그 외의 값들은 payload라 하며 자신이 필요한 값을 넣으면 된다.
}
그런데 액션을 여러개 만들 때 편하게 하기 위함이 Action Function / Action Creator이다.
밑에 처럼 만들어 보자.
1
2
3
4
export const INCREMENT = 'INCREMENT'; //export는 다른 파일에서도 써야 하니 꼭 붙여주자.
export const DECREASE = 'DECREASE';
export const increase = () => ({ type: INCREASE }); // 이렇게 만드는 것이 액션 함수.
export const decrease = () => ({ type: DECREASE });
Redux - Reducer
리듀서는 Action을 통해 새로운 State를 만들어내는 역할을 한다.
리듀서는 초기 상태가 필요하다.
1
2
3
const initialState = {
	number: 0,
};
위에 처럼 만든다.
그 후 리듀서 함수를 통해 값을 바꿀 수 있다.
밑을 보자.
1
2
3
4
5
6
7
8
9
10
11
12
13
14
15
16
17
18
19
function changeNumber(state = initialState, action) {
	// 초기값을 지정해주고, 2번 째 인자로 액션이 있다.
	switch (action.type) {
		case INCREMENT: // 타입을 넣어 준다.
			return {
				...state, // 이 때 state를 직접 수정하면 안된다고 한다.
				// 그래서 새로운 객체를 만들어 반환하자.
				number: state.number + 1,
			};
		case DECREASE:
			return {
				...state,
				number: state.number - 1,
			};
		default:
			return state;
	}
}
export default changeNumber;
위에서 만든 함수를 reducer함수라고 한다.
이제 이 함수를 store에다가 넣어주어야 한다.
Redux - Store
Store은 state를 관리하는 옥천 hub다.
1
2
3
4
5
6
7
8
9
10
11
12
13
import { createStore } from 'redux';
import reducers from './reducers';

// 스토어 생성 인자로 위에서 만든 리듀스 함수를 넣어주면 된다고 한다.
// 2번째 인자로 리덕스 개발자 도구를 넣을 수 있다.
// 따로 구글 확장프로그램[Redux DevTools]을 설치하자.

const store = createStore(reducers);

// npm i redux-devtools-extension 패키지 설치 후
// 요렇게 할 수 있다고 한다.
import { composeWithDevTools } from 'redux-devtools-extension';
const store = createStore(reducers, composeWithDevTools());
이러면 만들어진다고 한다.
하지만 지금은 reducer 함수가 1개이다.
만약 reducer 함수가 여러개라면 이들을 한 곳으로 뭉쳐줘야 하는 작업이 필요하다.
combineReducer
combineReducer라고 여러 개의 REDUCER를 하나로 묶어주는 것이 있다.
1
2
3
4
5
6
7
8
9
10
import { combineReducers } from 'redux'; //위에 이 문구를 추가하자.

const rootReducer = combineReducers({
	changeNumber,
	otherfunction, // 만약 다른 리듀서가 있으면 이렇게 추가하면 된다.
});
// 이렇게 한 곳에 모아두자.

// 그리고 밑에처럼 한 번에 rootReducer를 이용해서 store에 넣으면 된다.
const store = createStore(rootReducer, composeWithDevTools());
Redux - dispatch / mapStateToProps, mapDispatchToProps
이제 위에 있는 store, action, reducer을 모두 connect해주고
함수를 쓰려면 dispatch를 이용해서 액션 함수를 실행시켜야 한다.
원래 방법은 mapStateToProps, mapDispatchToProps를 이용한다.
제일 이해하기 힘들었다. 아직도 이해 못하는 중..
1
2
3
4
5
6
7
8
9
10
11
12
13
14
15
16
17
18
19
//store에 있는 state값을 연결해주는 역할.
const mapStateToProps = (state) => ({
	number: state.number, // 위에서 만든 initialState.number이다.
	//state.changeNumber.number인지 헷갈린다.
});

//dispatch에 액션을 넣어주는 역할
const mapDispatchToProps = (dispatch) => ({
	increase: () => {
		dispatch(increase());
	},
	decrease: () => {
		dispatch(decrease());
	},
});

//이렇게 하고
//버튼을 만든 후 onClick={increase} 하면 함수를 사용 가능.
export default connect(mapStateToProps, mapDispatchToProps)(CountContainer);
위에처럼 만들 수 있다.
다른 방법으로는 Redux hooks가 있다 요것도 알아보자.
Redux - dispatch / Redux hooks
Redux hooks에서는 크게 useSelector(), useDispatch() 이 2가지의 메소드를 이용한다.
1
2
3
4
5
6
7
8
9
10
const changeNumber = props => {

 const number = useSelector((state) =>state.number)
 const dispatch = useDispatch();

 return (
   <button onClick={() => dispatch(increase())}>
   //여기서 increase 액션함수에서 정의 해준 값이다.
 )
}
요렇게 간단해진다.